The RADii Trim System
Product Category: Drywall
Video
Application
Distributed by Plastic Components
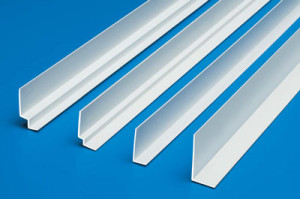
The simple, convenient, efficient way to finish a suspended ceiling terminating at a curved wall or surface.
- Eliminates expensive extruded metal column rings, radius reveal moldings and wall angles
- Perfect for outside and inside radius treatments, including compound or S-shapes
- Minimum Radius - RADii Trim System
Specifications
Sample Specification
The wall angle for radius treatments shall be as manufactured by RADii Systems (distributed by Plastic Components Inc.) from proprietary resins with the following technical characteristics:
| Property Hardness: |
PC800-1C, PC800-2C 96 |
PC800-3, PC800-4, PC800-6 96 |
| (Shore A, =/-3 Instantaneous Specific Gravity (+/.02) |
1.31 | 1.31 |
| Tensile (PSI) | >3,000 | >3,000 |
| 100% Modulus (PSI) | >1,900 | >1,900 |
| Elongation % | >200 | >200 |
| Ignitability (ASTM D1929) |
346°C | 330°C |
| Flammability (LOI/ASTM D2863) |
45-49 | 46-48 |
| Flame Spread (ASTM Ei 62) |
10 | 10 |
Information Sheets
Product Chart
| Add to Submittal | Product # | Description | Dimensions | Packaging |
|---|---|---|---|---|
| PC800-1C | Inside Radius: 15 in. (38 cm) |
25 pcs per tube | ||
| PC800-4 | Inside Radius: 54 in. (137 cm) |
20 pcs per tube | ||
| PC800-3 | Inside Radius: 30 in. (76 cm) |
25 pcs per tube | ||
| PC800-2C | Inside Radius: 24 in. (61 cm) |
25 pcs per tube | ||
| PC800-6 | Inside Radius: 30 in. (76 cm) |
25 pcs per tube |
Product Notes
Material Safety Data Sheet (MSDS)
RADii Trim System's vulcanized products; calendared sheets, extrusions, molded parts are considered "articles" and do not require a Material Safety Data Sheet.
Installation Instructions - Standard Application
1. General Application Information
A. This is a TRIM system. It is not designed to support, nor will it support the weight of the grid.
B. Do not use pop rivets in Radii Trim Products without consulting the factory.
C. Do not use a hair dryer in place of a heat gun.
D. The wall angle MUST closely conform to the radius. This is CRITICAL.
Many installers find that placing a metal hanger strap against the vertical leg, then attaching the wall angle to the wall through the metal strap ensures the snug fit required for best results. A snug fit is especially important for INSIDE radius applications.
E. The following Minimum Radius Table will help to properly install the product.
Catalog Minimum Minimum Size
| Catalog # | Minimum INSIDE radius | Minimum OUTSIDE radius | Size |
| PC800-1C | 15" | 15" | 9/16" |
| PC800-2C | 24" | 24" | 15/16" |
| PC800-3 | 30" | 30" | 3/8" reveal |
| PC800-4 | 54" | 36" | 3/4" reveal |
| PC800-6 | 30" | 30" | 1/4" reveal |
2. Installation Instructions
See note D above. While not essential, attaching the wall angle to the wall through a metal hanger strap ensures the snug fit required for best results. This is especially true for INSIDE radius applications.
A. OUTSIDE RADIUS
A heat gun is NOT REQUIRED for outside radius installations.
1. Attach one end of the wall angle to wall with any standard fastener system (including industrial adhesives). If using an adhesive, a mechanical fastener must also be used.
NOTE: Electrical tie wraps (brand name: Panduit Straps) and a tensioner device (also from Panduit) are often used as inexpensive, easy-to-install column collars.
2. Continue to "walk" down the wall every 1 to 3 inches (depending on the radius) with a standard fastener until the entire wall angle section is installed.
3. To size length of wall angle Install as instructed above (#2) until the radius ends. Use a utility knife to score the wall angle where you want the radius run. Break the wall angle along the scored lines.
B. INSIDE RADIUS
The wall angle for an inside radius application must be installed before using the heat gun.
1. Place wall angle along the area where it will be installed WITHOUT PERMANENTLY ATTACHING WALL ANGLE.
2. Place the first PERMANENT fastener in the center of the wall angle.
3. Install the next fastener 1 to 3 inches to the right; the distance depends on the radius. Install the next fastener 1 to 3 inches to the left of center. Continue installing alternating fasteners so there is a SNUG FIT against the wall. A snug fit against the wall is critical for inside radius applications. Suggestion: At this point many installers lay in the ceiling tiles to expedite the shrinking process.
4. Use a 1200 watt heat gun – not a hairdryer. Begin at one end of the installation. Apply heat in a "stroking" motion toward the opposite end of the wall angle. DO NOT APPLY HEAT FROM THE CENTER OUTWARD. Unless the tiles have already been installed (see #3 above), allow the installation to cool before installing the ceiling tiles.
On INSIDE radius treatments the horizontal leg – the one showing after installation – will ripple and become uneven when installed. THIS IS NORMAL. The ripples can be removed with any standard heat gun. Start at one end of the installed wall angle and direct the hot air on the rippled leg. Use a smooth stroking motion when applying the heat. The ripples will shrink and disappear to form a perfect inside radius.


